3. How to use MemberChecker
Running the Application
Once the application is running the S-shaped icon will be displayed in the System Tray, next to the clock at the bottom right hand side of the screen. Clicking on the MemberChecker Icon when the application is running will display the Settings Screen, please refer to the information above for help on the Settings Screen.
Scanning a card
Once the application is running, the system waits for input from either the on-screen barcode entry or a scanner, if one is attached to your system. If the system detects a scanned card, a connection to the online Sports-Booker system is made and all available information pertaining to the user is downloaded.
Memberchecker keeps no local information about the users that you have set up on SportsBooker so an active internet connection is essential for the system to work correctly.
Once a successful connection has been made and the data downloaded, the system displays the popup screen.
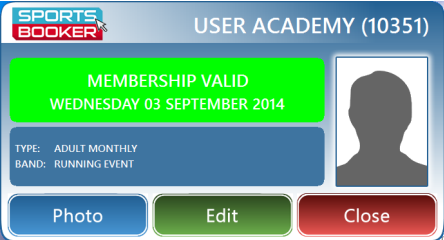
The popup screen shows a variety of different information, the information that can be displayed is explained below.
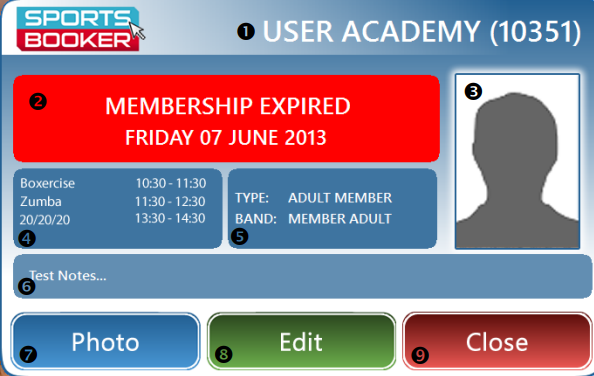
1. Member’s name and barcode number
2. Membership information panel: Shows the member’s current status and expiry date of their current membership. The background colour changes to indicate different states such as green for everything is OK and red for warning.
3. Member’s photograph if that have one, if not the above image is shown.
4. Class information panel: shows the classes that the member is booked into within the time period set on the settings screen (Auto attendance minutes).
5. Membership type panel: Shows the member’s type and band.
6. Notes panel: Shows any notes that have been added to the member’s record.
7. Photo button: Clicking the photo button shows the photo screen.
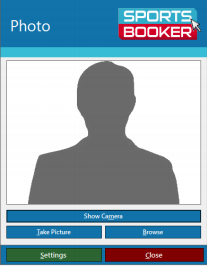
a. Clicking the Show Camera button allows the system camera’s image to be captured by the application.
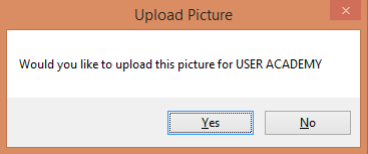
b. Take Picture button takes a picture of what is currently shown in the window. Once clicked the system will show a message to confirm the image replacement.
c. The Browse button allows an existing image to be chosen from the file system
d. The Settings button opens the settings screen explained above.
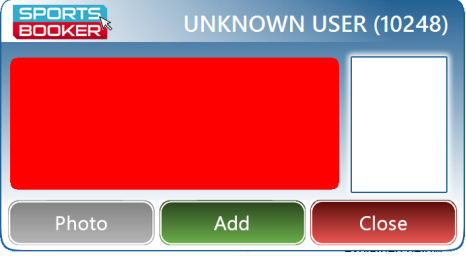
e. The Close button closes the current screen. If the window is displayed with any other status other than green or there are notes on the account, the window does not fade away automatically but stays on the screen so the relevant information can be checked. If the member is unknown to the system, the following screen is shown. The screen displays an ‘Add’ button in place of the edit button and allow a new member to be created with for the card that was scanned.
Kiosk mode
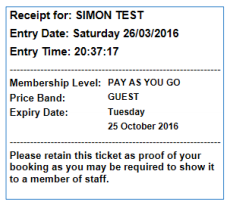
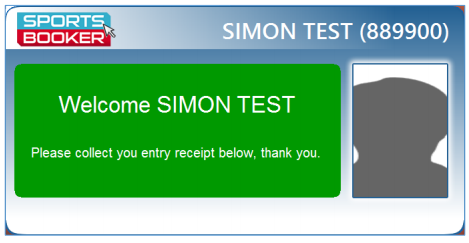
MemberChecker can be run in Kiosk Mode, this is a special mode used on unattended kiosks, it 15 allows customers to scan their own cards, a message will be displayed in the centre of the screen (regardless what setting is set in Popup Position), this indicates to the customer that their scan was successful. The scanner will not allow the scanner to scan the same card for another 30 seconds to ensure there are no duplicate scans. The screen displayed can be seen below.
Once the popup is shown a receipt is printed, an example of this can be seen below. The receipt will show the next two classes that the customer will attend if they are booked in for classes or will just show acknowledgement of their entry if not. An example of a receipt can be seen below.