How to add disclaimers to activities
Setup
Firstly, you will need to make sure that this feature is enabled.
Go to Settings > Feature choices and tick the Dashboard - Settings - Attendees box and Update settings.
Then go to Settings > Attendees.
You then need to update the following settings:
Disclaimer recipient email address - the email address entered here will receive an e-mail notification of all disclaimer registrations.
Age of consent
Above age of consent certification
Below age of consent certification
Print tickets on booking date only
Disclaimer logo (png)
Attendee disclaimer content
Require attendees to re-sign disclaimer
Then click Update settings in the middle of the page.
Entert the Disclaimer content in the lower half of the page and click Update disclaimer.
You can change what activities require a disclaimer by going to Settings > Attendees > Activities.
You can also add new attendee questions by going to Settings > Attendees > Questions > Add question.
Next go to Settings > Bookings.
Scroll down and set the Add booking receipt (pdf) and Add quick response code to booking receipt options to Yes and click Update details at the bottom of the page.
Process of completing disclaimers
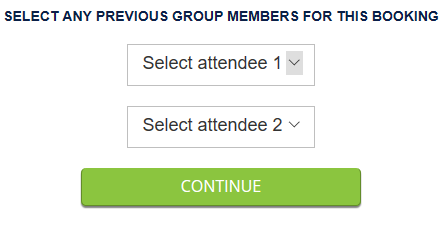
When a customers makes a booking which requires a disclaimer they will be given the option to select any attendees they have added under this particular customer account previously.
This could include other friends/relatives or themselves if they have filled one in before.
This speeds up the disclaimer process if the Require attendees to re-sign disclaimer is set to No in your attendee settings.
If this is the first time this customer has added attendees they will proceed to the checkout page as normal.
Once the payment has been processed the customer will be presented with the order confirmation screen. They will then be given the opportunity to click the Complete disclaimers button.
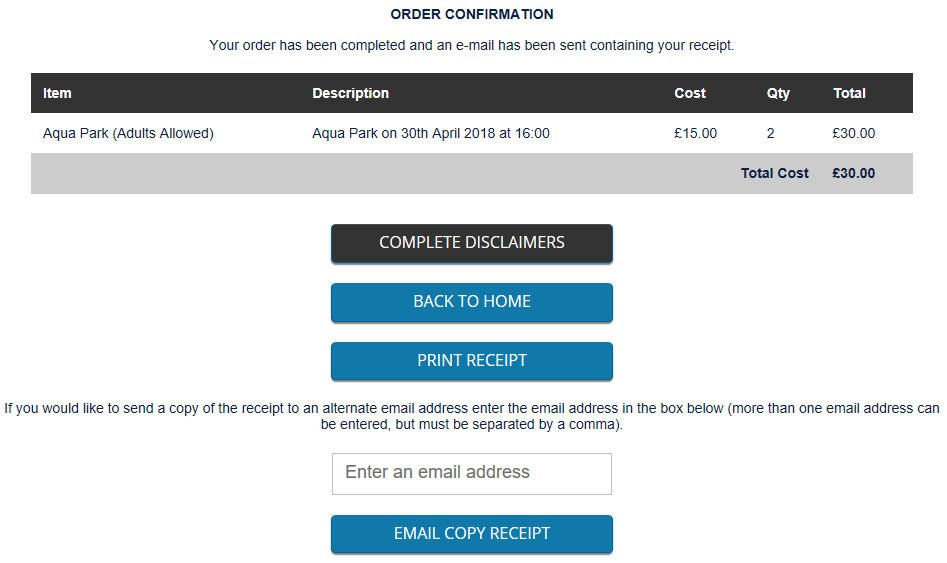
At this stage the group leader can fill out their own disclaimer which they will recieve confirmation of once complete.
Separately from the above, the group leader who made the booking will recieve an e-ticket email (See below).

The top link provided is for the group leader to log in and see who has completed their disclaimers.
The second link provided in the email is for other attendees to log in and complete theirs.
A booking ticket with a barcode will also be attached at the bottom of this email.
Alternatively, other attendees can go to the customer site and click the Complete disclaimers button and enter the Booking reference number which is provided at the top of the group leader's email.

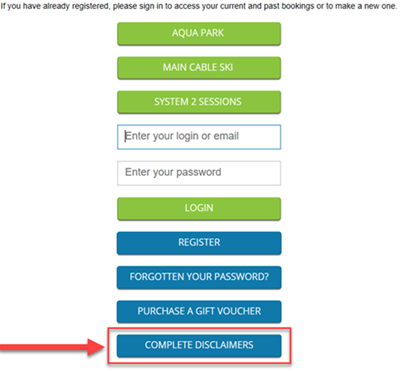
Note: To display this disclaimers button on your customer site, go to Settings > Public website and set the Enable link to disclaimers option to Yes. The click Update details at the bottom of the page.
Once an attendee has completed their disclaimer they will recieve 2 emails. One will have a copy of their completed disclaimer enclosed. The other will provide details of their registration as an attendee.
The attendee registration email will contain an 'Attendee password'.
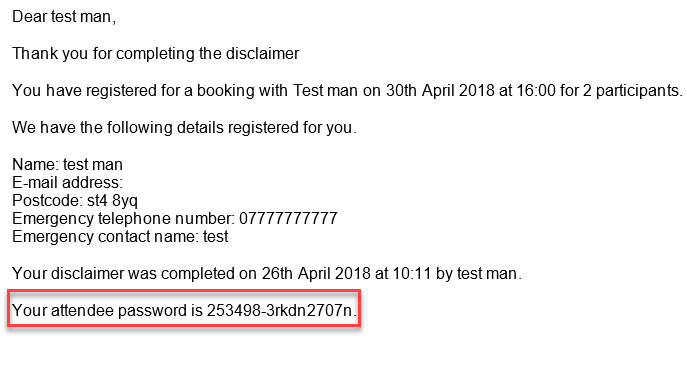
An attendee password can be input by the group leader if the individual has previously filled in a disclaimer but with a different group leader. This saves the need for them to fill one out again (See below). Once they have entered the password they will be added to the list of attendees.

How to view who has completed their disclaimers
Go to the Calendar section at the top of the dashboard.
Click on the particular session you are looking to view the attendees of.
Then click the Attendance button in the top-left corner of the pop up box.
This will tell you which individuals have completed their disclaimers.